
Introduction
Hey there, Everyone! 👋 It’s great to have you back for another exciting installment in our Azure Bicep series. We’ve been on quite a journey together, haven’t we? From learning the basics of Azure Bicep in Part-1 to mastering the art of parameters in Part-2 and variables in Part-3, you’ve come a long way! 🌟
Today, we’re going to take your Bicep skills to a whole new level. 🚀 That’s right, we’re diving into the world of Azure Bicep modules! 📦
Now, you might be thinking, “Modules? 🤔 That sounds a bit fancy.” But trust me, once you discover the power of modules, you’ll wonder how you ever managed without them. 💪
In this comprehensive guide, we’ll explore everything you need to know about Azure Bicep modules. We’ll start by understanding what modules are and why they’re so valuable in the world of infrastructure as code. Then, we’ll roll up our sleeves and get hands-on with creating and referencing modules in your Bicep files. 🔧
We’ll also cover some best practices for designing and organizing your modules, ensuring that your code stays clean, reusable, and maintainable. 🧹 And to top it off, we’ll walk through some real-world examples and use cases that’ll show you just how powerful modules can be. 🌍
So, grab your favourite beverage ☕, settle in, and get ready to elevate your Azure Bicep skills to new heights. By the end of this guide, you’ll be a module maestro, ready to tackle even the most complex infrastructure challenges with ease. 😎
What are Azure Bicep Modules?
Alright, so you might be wondering, “What exactly are these Azure Bicep modules everyone’s talking about?” 🤔 Well, let me break it down for you.
At their core, Azure Bicep modules are just Bicep files. Yep, you heard that right - they’re not some fancy new syntax or a completely different language. They’re Bicep files that we use in a special way to make our lives easier when building complex infrastructure.
The Building Blocks of Your Infrastructure
Think of Bicep modules as the building blocks of your infrastructure. Just like how you’d use Lego bricks to build a complex structure, you use Bicep modules to build your Azure infrastructure. Each module represents a specific part of your infrastructure - maybe a storage account, a virtual network, or an app service.
Here’s a simple diagram to show you how this works:
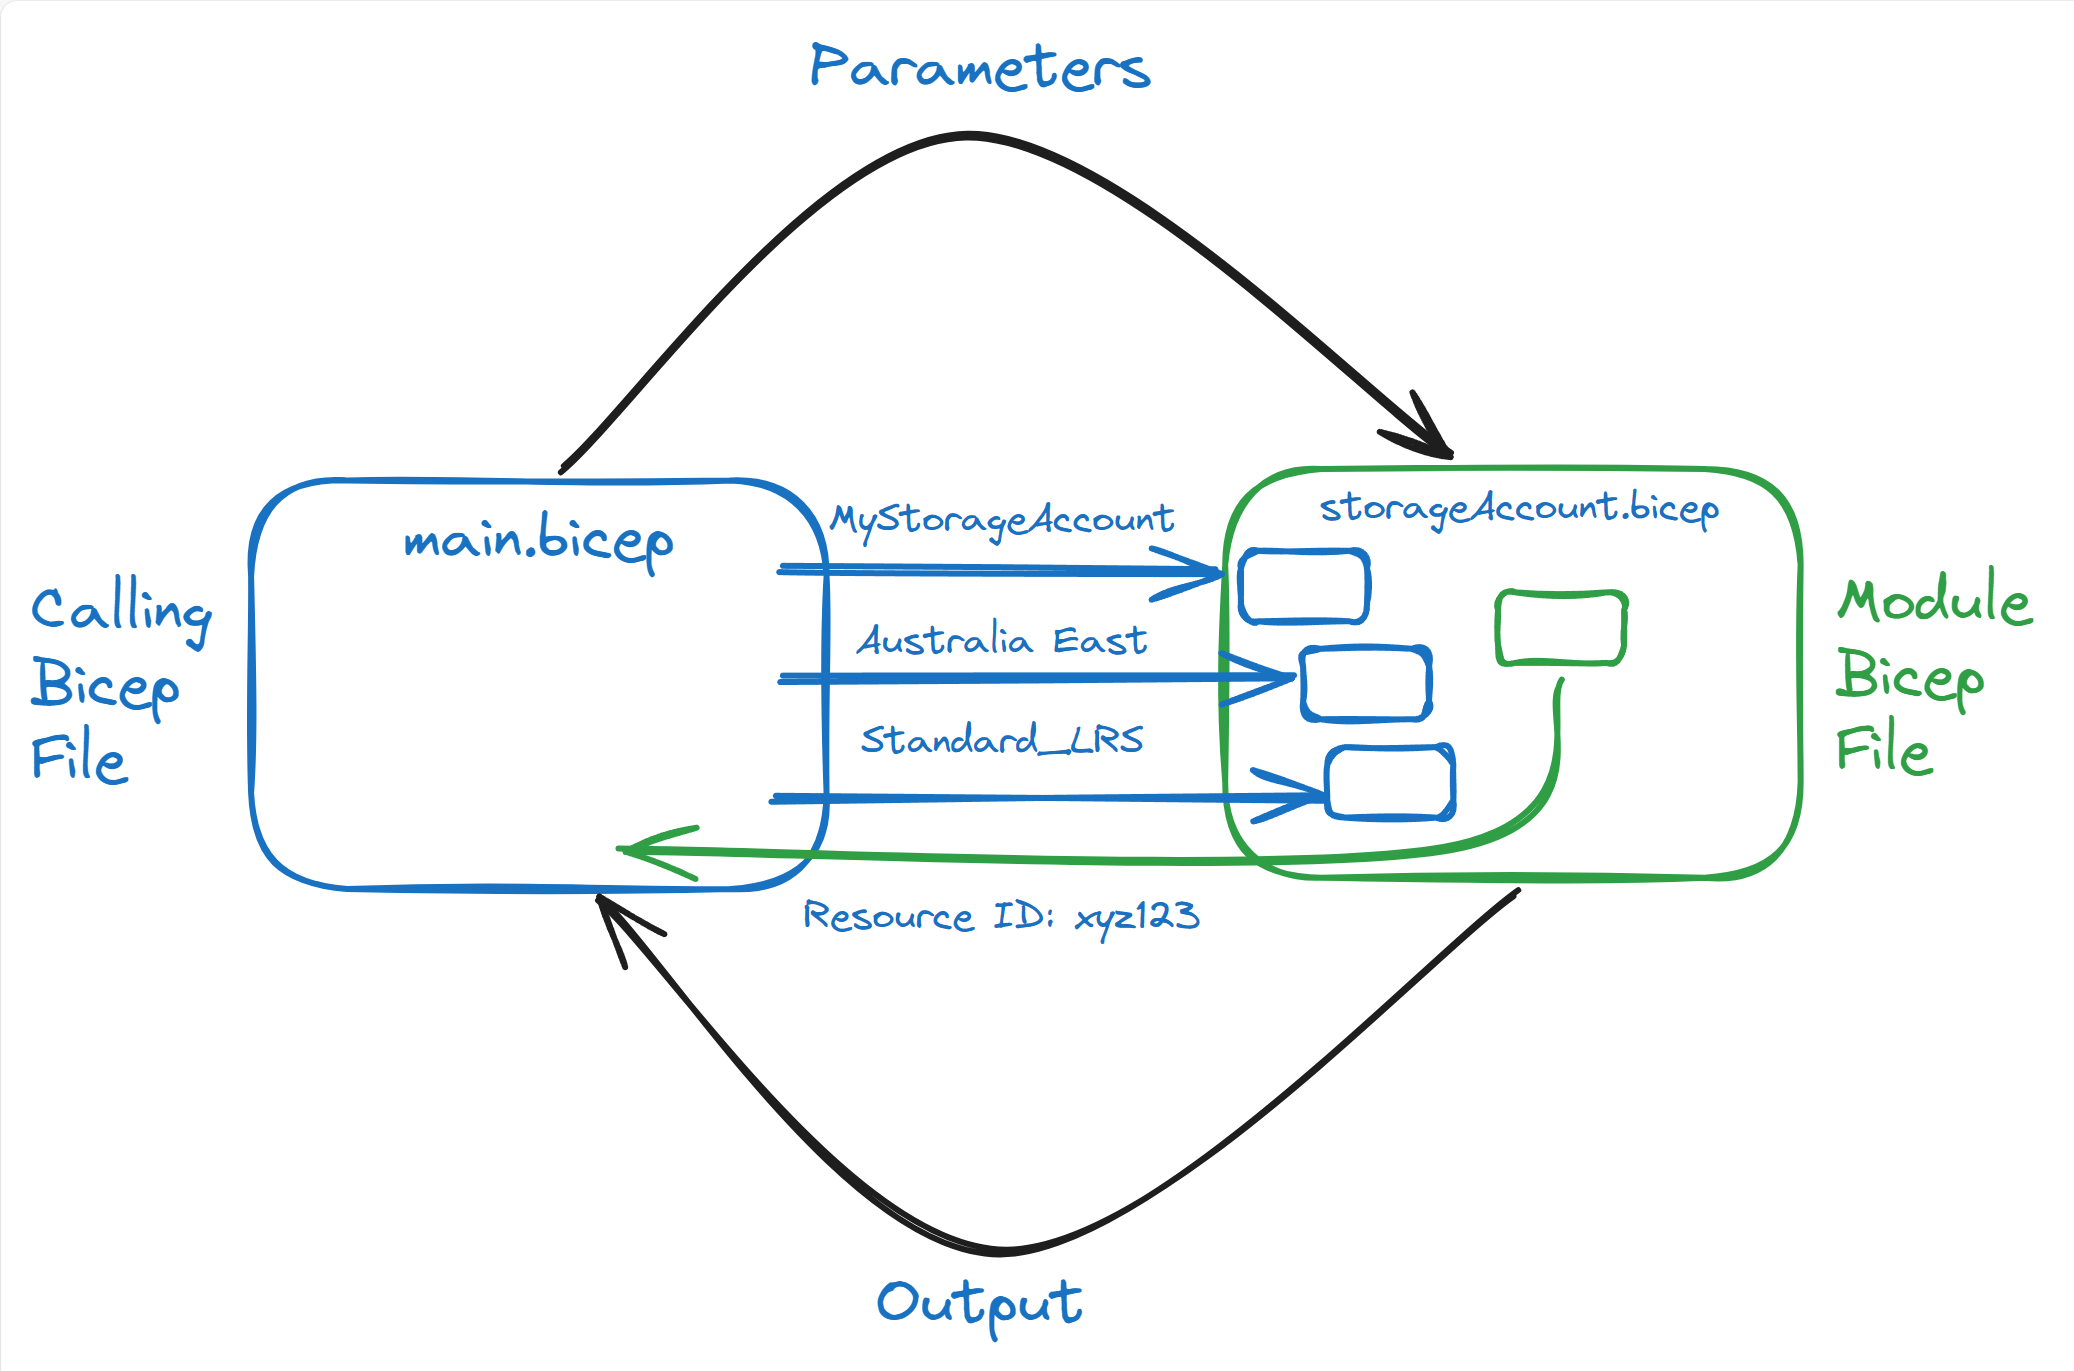
In this diagram, you can see how a main Bicep file (think of it as your Lego baseplate) interacts with a module file (one of your Lego bricks). The main file passes parameters to the module, and the module returns outputs back to the main file. Cool, right?
Modules vs Regular Bicep Files
Now, you might be thinking, “How is this different from a regular Bicep file?” Great question! Let’s break it down:
-
Regular Bicep Files:
- These are your standalone deployment files.
- They often represent a complete solution or application.
- As your infrastructure grows, these files can become large and complex.
-
Bicep Modules:
- These focus on a specific part of your infrastructure.
- They’re designed to be reusable across different deployments.
- They help keep your main Bicep files clean and focused.
The key difference isn’t in the syntax or structure - it’s in how we use them. Modules let us break down complex infrastructure into manageable, reusable pieces.
Why Bother with Modules?
You might be wondering, “Why go through all this trouble?” Well, modules bring some pretty awesome benefits:
- Reusability: Write once, use many times. No more copy-pasting code!
- Maintainability: Need to update how you deploy storage accounts? Just update the module, and all your deployments using that module are automatically updated.
- Readability: Your main Bicep files become easier to read and understand.
- Collaboration: Team members can work on different modules independently.
In the next sections, we’ll dive deeper into how to create and use these modules, including how to work with parameters and outputs. But for now, just remember: modules are your friends in building scalable, maintainable Azure infrastructure with Bicep!
So, ready to start building with your new Bicep Lego set? Let’s go! 🚀
Creating and Referencing Modules
Now that you understand the power and characteristics of Azure Bicep modules, let’s roll up our sleeves and learn how to create and use them. Trust me, it’s easier than you might think!
Anatomy of an Azure Bicep Module File
Before we dive into creating a module, let’s break down the key components that make up a Bicep module file:
-
Parameters: These are the inputs to your module. They allow you to customize the module’s behavior when it’s used in different contexts.
1
2
param storageAccountName string param location string = resourceGroup().location -
Resources: These define the Azure resources that your module will create or modify.
1
2
3
4
5
resource storageAccount 'Microsoft.Storage/storageAccounts@2021-06-01' = { name: storageAccountName location: location // other properties... } -
Outputs: These allow your module to return values to the parent template that’s using the module.
1output storageAccountId string = storageAccount.id -
Variables (optional): These can be used to store and reuse values within your module.
1var storageAccountSku = 'Standard_LRS'
Now that we understand the anatomy, let’s create a module!
Creating a Module
Remember, a module is just a Bicep file with a specific purpose. Here’s how you can create one:
- Create a new file with a
.bicepextension. Let’s call itstorageAccount.bicep. - Define the resources you want in this module. For our example, we’ll create a storage account.
Here’s what your storageAccount.bicep might look like:
|
|
That’s it! You’ve created a module. 🎉 Let’s break down what we did:
- We defined parameters that allow customization when the module is used.
- We created a storage account resource.
- We added an output to return the storage account’s ID.
Referencing a Module
Now, let’s see how we can use this module in our main Bicep file. Here’s how you reference a module:
- Open your main Bicep file (let’s call it
main.bicep). - Use the
modulekeyword to reference your module file.
Here’s an example:
|
|
Let’s break this down:
- We’re using the
modulekeyword to reference ourstorageAccount.bicepfile. - We’re giving this module deployment a name: ‘storageAccountDeployment’.
- We’re passing parameters to customize the storage account.
- We’re accessing the module’s output and exposing it as an output of our main template.
And there you have it! You’ve successfully created and referenced a module. 🎊
And there you have it! You now know how to create and reference modules in your Azure Bicep files. 🎉 In the next section, we’ll explore some best practices for designing and organizing your modules.
Best Practices for Designing and Organizing Modules
Now that you know how to create and use modules, let’s talk about how to do it like a pro. Following these best practices will help you create modules that are easier to use, maintain, and scale. Let’s dive in!
1. Keep Modules Focused and Single-Purpose 🎯
Think of each module as a specialist, not a jack-of-all-trades.
- Do: Create separate modules for different resource types or logical groupings.
- Don’t: Try to cram everything into one giant module.
Example: Have separate modules for storageAccount.bicep, virtualNetwork.bicep, and webApp.bicep instead of a single infrastructure.bicep.
2. Use Meaningful and Consistent Naming Conventions 📛
Good names make your code self-documenting.
- Do: Use clear, descriptive names for your modules, parameters, and outputs.
- Don’t: Use cryptic abbreviations or generic names.
Example: Name your module webAppWithDatabase.bicep instead of wawd.bicep or module1.bicep.
3. Leverage Parameters for Customization 🎛️
Parameters are your friends for creating flexible, reusable modules.
- Do: Use parameters for values that might change between deployments.
- Don’t: Hardcode values that should be configurable.
Example:
|
|
4. Provide Default Values When Appropriate 🎛️
Default values can make your modules easier to use while still allowing customization.
- Do: Provide sensible defaults for parameters when possible.
- Don’t: Force users to provide every single parameter value.
Example:
|
|
5. Use Outputs to Share Important Information 📤
Outputs allow your modules to communicate valuable information back to the parent template.
- Do: Output important resource properties or IDs that might be needed elsewhere.
- Don’t: Output unnecessary information that clutters your template.
Example:
|
|
6. Organize Modules in a Logical Folder Structure 📁
A good folder structure makes it easier to find and manage your modules.
- Do: Group related modules in folders.
- Don’t: Put all modules in a single directory as your project grows.
Example folder structure:
|
|
7. Version Your Modules 🔢
Versioning helps manage changes and ensures compatibility.
- Do: Use semantic versioning for your modules.
- Don’t: Make breaking changes without incrementing the major version number.
Example: Use tags or branches in your source control system to mark versions like v1.0.0, v1.1.0, v2.0.0, etc.
8. Document Your Modules 📚
Good documentation makes your modules easier for others (and future you) to understand and use.
- Do: Include comments explaining the purpose of the module and any complex logic.
- Don’t: Assume that the code is self-explanatory.
Example:
|
|
9. Test Your Modules 🧪
Testing helps ensure your modules work as expected and catches issues early.
- Do: Create test deployments for your modules with various parameter combinations.
- Don’t: Assume your module will work in all scenarios without testing.
Example: Create a test script that deploys your module with different sets of parameters and verifies the outputs.
10. Keep Resource API Versions Up to Date 🔄
Using the latest API versions ensures you have access to the newest features and improvements.
- Do: Regularly review and update the API versions for your resources.
- Don’t: Use outdated API versions unless required for compatibility reasons.
Example:
|
|
By following these best practices, you’ll create Bicep modules that are easier to use, maintain, and scale. Remember, good module design is as much an art as it is a science. As you gain more experience, you’ll develop an intuition for what works best in your specific scenarios.
Real-World Examples and Use Cases
Now that you know how to create and organize modules, let’s see how they can be applied in real-world scenarios. Here are a few examples and use cases that demonstrate the power of modules:
Example 1: Creating a Reusable Virtual Network Module 🌐
Alright, let’s roll up our sleeves and create something useful! 💪 We’re going to build a reusable virtual network module. This is super handy because virtual networks are the backbone of many Azure architectures, and you’ll likely need to create similar ones across different environments or projects.
The Module: vnet.bicep
First, let’s create our vnet.bicep file. This module will allow us to create a virtual network with two subnets:
|
|
Let’s break this down:
- We’ve defined parameters for all the customizable aspects of our VNet, like names and address prefixes.
- We’re creating a single
vnetresource with two subnets. - We’re outputting the VNet ID and both subnet IDs, which could be useful for other resources that need to reference this VNet.
Using the Module: main.bicep
Now, let’s see how we can use this module in a main deployment file:
|
|
Here’s what we’re doing:
- We’re using an
environmentparameter to make our deployment environment-specific. - We’re calling our
vnetmodule and providing all the necessary parameters. - We’re outputting the VNet and subnet IDs from the module, making them available for other resources or modules in our main template.
By using a module for your virtual network, you ensure consistency across environments and reduce duplication of code.
Example 2: Modularizing a Complex Application Stack 🧩
Let’s tackle a more complex scenario: deploying a web application with a database and storage. We’ll break this down into modules for better organization and reusability.
Project Structure
|
|
Module: appService.bicep
|
|
Module: sqlDatabase.bicep
|
|
Module: storageAccount.bicep
|
|
Main Deployment: main.bicep
|
|
This example demonstrates how to break down a complex application stack into manageable modules. Each module (appService.bicep, sqlDatabase.bicep, storageAccount.bicep) focuses on a specific resource type, while the main deployment file (main.bicep) orchestrates the overall infrastructure.
By modularizing in this way, you can easily reuse these components in other projects, maintain them separately, and keep your main deployment file clean and easy to understand.
Example 3: Sharing Modules Across Teams and Projects 🤝
In larger organizations, it’s common to have a central team that manages core infrastructure components. Let’s see how we can create and use shared modules for common resources.
Shared Module Repository Structure
|
|
Shared Module: vnet.bicep
|
|
Using Shared Modules: main.bicep
Team members can use these shared modules in their projects by referencing them directly from the central repository:
|
|
In this example, we’re using shared modules for networking and storage. The modules are stored in a central GitHub repository and referenced directly in the main.bicep file.
This approach allows teams to:
- Maintain consistency across projects
- Leverage pre-approved, standardized configurations
- Quickly incorporate updates to shared modules across multiple projects
- Reduce duplication of code and effort
By using shared modules, organizations can ensure best practices are followed, reduce the learning curve for new team members, and maintain a more manageable and consistent infrastructure across different projects and environments.
Conclusion
Wow, what a journey we’ve been on! 🚀 We’ve explored the world of Azure Bicep modules, and I hope you’re now feeling confident about using them in your own projects. Let’s quickly recap what we’ve covered:
- We learned what Azure Bicep modules are and how they differ from regular Bicep files.
- We dove into creating and referencing modules, including how to access module outputs.
- We covered best practices for designing and organizing your modules.
- We explored real-world examples, from creating a reusable virtual network module to modularizing a complex application stack and sharing modules across teams.
By leveraging modules, you can create more maintainable, reusable, and scalable infrastructure-as-code solutions. Remember, good module design is a skill that develops with practice, so don’t be afraid to experiment and refine your approach over time.
What’s Next? 👀
Our Bicep adventure is far from over. In our next article, we’re going to level up even further with “Advanced Resource Deployment with Azure Bicep”.
We’ll be diving into some exciting topics:
- Conditional deployments: Learn how to deploy resources based on specific conditions.
- Loops in Bicep: Discover how to create multiple resources efficiently.
- Resource dependencies: Understand how to manage complex dependencies between your resources.
These advanced techniques will give you even more power and flexibility in your Azure deployments. Whether you’re managing a small project or a large-scale enterprise infrastructure, these skills will help you create more dynamic and adaptable Bicep templates.
So, I’ll see you in the next article where we’ll take your Bicep skills to the next level! Until then, happy coding! 💻✨